Art Tips for Building Forests
As an environment artist in the games industry, I’ve made quite a few forests over the years. At Eastshade Studios, both our recently released title Leaving Lyndow, and our upcoming title Eastshade feature plenty of forests. There’s something very powerful about walking through a shroud of trees, and attempting to recreate that feeling in a game world is one of my favorite things to do. In my unending quest for pretty forests, I’ve learned a few things that I believe are important to eliciting that growthy feel. Some may seem simple, but I’m always surprised by how many game forests overlook some of these.

A disclaimer: This article is not about how to create great foliage assets. There are quite a lot of good resources on that topic. This is also not a technical tutorial on how to author a forest in terms of shaders, lods, or optimizations. I actually have a lot to say on that topic and would like to write another article at some point on that specifically. This article focuses on the larger picture such as deciding what assets you need to make, how best to use them, things to think about, and ideas for more believable and less monotonous forests.
Reference
I’ve heard this a thousand times, maybe you’ve heard it a thousand times, I’ve said it a thousand times, and nonetheless, I will say it again: Reference is paramount. Virtually all the things mentioned here I learned as a result of looking closely at reality, and making decisions about what is important to the big read. Walk in forests, pay attention, look at what’s there. Rely on what you objectively see, not your own ideas of what a forest has. Whenever you are trying to capture the magic of reality, you need to be informed by what you actually see, not what you think you see. This is true even if your forest is a stylized fantasy forest with orange waterfalls and blue bushes. With that being said, let me pass on some things I’ve found to be important.
Clustering
Resist the urge to scatter foliage and trees evenly over a space. Organic randomness is a funny thing, so don’t be afraid to boldly cluster a lot of things together while leaving other parts practically barren. On top of this, a lot of small shrubs and sapling tend to grow symbiotically at the base of other plants. In addition to looking natural, it can also cover ugly intersections between your trunks and the ground. Sometimes there is a tightly packed cluster of thin trunks that almost seem to grow out of each other. Don’t miss things like this! Sometimes I see people spending hours toiling away at leaf normal maps while overlooking more noticeable things like tree placement.

Trunk Density
This may be the most important tip in this write-up. Walk in a forest, and you will notice there are a LOT of trees. Hundreds of trees are in view at any given moment.

While mastering this level of density may seem like more of a task in optimization than a task in art, there is actually one crucial art trick that helps performance as much as any draw call batching, shader optimization, or GPU instancing, and here it is: Not all of your trees need canopies. Getting a tree to look right standing by its lonesome requires a lot of triangles in the canopy, and this is the way we author most trees. But when many trees are clustered together, the canopy reaches maximum fullness rather quickly, and any additional trees are adding thousands of triangles, but not helping fill the canopy. Put another way, we tend to reach our desired canopy density long before we reach our desired trunk density. So what can you do? Add trunks without canopies. In my case, I just use my dead tree models, which are much lower poly since they have no leaves.
Dead Things
Something I see commonly neglected in game forests are dead things of all kinds. A large percentage of the trees in a forest are dead with no leaves. This is true for both deciduous and coniferous forests. On top of adding believability, they also have the added benefit of being lower poly since they don’t have canopies (see the section on trunk density). When trees die, sometimes they fall. You can make an old overgrown log, or simply turn a tree sideways branches and all. Then there are stumps. Typically when one pictures a stump it’s the man-made stump, but there is also the broken off tree, or rotted out variety of stumps, which are natural and numerous in all forests.

Don’t forget unlikely notable sights, like a fallen tree leaning against another, a log dangling off a boulder, or a tree that has fallen into a river. Sometimes we neglect these things because we’re too focused on the more common sights, but these sights are often the most interesting in a real forest, why omit them from our fake forests? They are critical for breaking up the monotony of the environment.

Trunk Bases
Humans tend to look where we step, so players will spend most of their screen time with their camera pointed eye level or even cast downward a little. This holds true in both first and third person. When we author a tree, we often focus on its canopy, likely because it’s the largest portion of the tree in terms of sheer size. While the canopy is important, especially the silhouette as its cast against sky, in denser forests the canopy tends to get swallowed up by other canopies, and the trunks at the eye level become even more important. Photogrammetry (or photo scanning) can help a ton with this, especially since the texture of a tree trunk and its organic shape make for perfect photogrammetry candidates. You may have to use a separate 1:1 texture for the lower part of the trunk, and find a way to switch to tiling texture as you move up the trunk. This can be handled with a blend shader, or with multiple meshes if you can find an undistracting place to put the seam. Another option is to devote more texel density to lower parts of the trunk in the UVs.

I must admit I haven’t put enough love into some of my own tree trunks where they meet the ground, but it’s something I will definitely pay more attention to for my tree assets in the future.
Undergrowth
Generally every available space on a forest floor is covered with some kind of foliage. One’s immediate intuition might be to use grass, but tall green grass is not terribly common for a natural forest floor. It can definitely create a cool surreal look to use a sea of grass under tall trees, but just know that shrubs, ferns, and low lying leafy stuff is much more common.
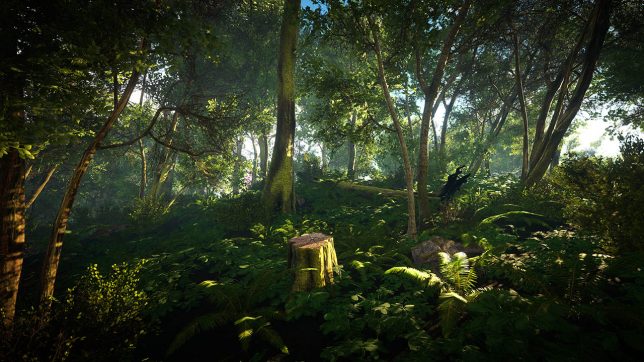
Rocks
Rocks of all sizes are important. Pebbles in spots without plants can add a lot more believability to the barren ground. More and more people are using dynamic tesselation and building the smaller rocks directly into the texture. This is a great option if you have the shaders to support this. Otherwise placing the pebbles as meshes works as well.

I prefer to model my mid-size rocks in clusters. This makes it possible to spend time assembling a really nice looking formation which you can propagate quickly. Rocks are probably one of the best use cases for photogrammetry I can think of. If you have means to do this, I’d recommend doing so. Contrary to what some may think, it won’t save you time. It will very likely be more difficult and take longer than modelling them yourself, but the results are worth it.

Rivers, Streams, Lakes, and Ponds
In real life, if you get to the end of a forest hike without seeing any water, it was probably a boring hike. Hiking trails are often carved because of water. Water is probably one of the first things you should be laying down while deciding on the layout of your forest. I tend to decide on lakes and rivers right at the start, and build my forests around them.

There’s no two ways about it. Rivers are hard. If you’re new to game art, you may assume there’s an industry standard way of making rivers that you’re not being let in on. There’s not. If you know the perfect way to do them please let me know. I’m just here to tell you that you’ve got to have them, else you are committing to a forest no one would want to hike in. When I’m first starting my forest layout, I often lay in the bodies of water first, and structure the entire biome around them. Something that helped the look of my rivers was to dress the edges of my rivers in lots of rocks.
Particles
Forests tend to be very visually busy environments. This onslaught of noise can often make for an image without easily perceivable depth. This is true for forest photography as well. Something that can help with this is particles, weather it be butterflies fluttering about, leaves falling, white fluff drifting in the air, or dusty specs. The parallax and movement helps with perceived depth.
Time Wasting
There are a couple of rabbit holes in forest making that I feel can waste a lot of time for little benefit. Approach these tasks with caution so you don’t fall in.
Variants – When creating a new type of foliage, start with one variant. I’m serious. Don’t start plugging away at a second or third variant before you even test your plant in an actual forest. For one, you don’t even know if this new foliage will work, or what will make it look good. So don’t waste time making five variants from the get go, only to discover you’ve crafted them in a way that looks awful in the context of a forest. What’s even more important: See how few you can get away with first. Will anyone even notice all the extra variation? Is there something more important you should be spending time on that will offer variety in a more impactful way? I got really far with only four broadleaf variants (eight including dead versions).

Modelling For Texture Bakes – This is quickly becoming the de facto way to create foliage textures, and I do it too, but you have to be smart about it. Don’t waste time modelling the perfect leaf and making variants of it. I don’t think it’s an exaggeration to say foliage textures are 90% silhouette. Spend all your texture creation time iterating on the silhouette, not the normal maps, or making sure every twig lines up with every group of leaves. Step back. Look at the big read. To illustrate my point, take a look at the comparison image below. On the left are some trees with a beautiful diffuse and lovingly baked normals. On the right are the same trees with a pure green diffuse map and no normal map at all. All it has texture-wise is an alpha mask.

As you can see, it’s not a huge difference. Squint your eyes and you probably can’t even tell. The left does look a little better, but ultimately the silhouette carries the weight, and both renderings read similarly as a tree. General leaf size, branch structure, coverage, and scraggly twigs should be where you focus your efforts.
Be Bold with Experimentation
I think it’s important to be creative with your assets. Sometimes you can stumble on something interesting, even if it’s not what you intended. For example, I onced jammed the second LOD model of an oak tree into the ground and found its canopy made excellent bushes. It was already low poly since it was meant to be LOD1. I did some quick work making them into proper bushes, and now I use them even more than my original bushes, and it offers great variety to the mid-level shrubbery.

Conclusion
The TLDR is:
- Use reference. Do research on real forests.
- Don’t distribute plants and trees evenly. Make some clusters of tightly packed vegetation.
- In dense forests, not all the trunks need canopies. This maintains density while saving polygons.
- Don’t forget about dead trees, fallen logs, decaying stumps, and anomalies like a dead trees leaning against other trees.
- Put extra love near the base of the trunk, where players eyes will fall.
- Cover the ground with foliage. Ferns and shrubs are more common than grass.
- Use rocks of all sizes to break up the endless foliage.
- Water is usually the most interesting thing in a forest. The more lakes, ponds, and rivers the better.
- Particles like bugs, leaves, fluff, or dust can add depth.
- Don’t waste time on leaf noodling or excessive variants.
- Don’t be afraid to try using your assets in unexpected ways.


