Leaving Lyndow is a short (about 45 minutes) first-person adventure game. The game is a prequel to our upcoming open-world game Eastshade. While set in the same setting as the larger upcoming title, it features distinct mechanics and story. We announced Leaving Lyndow on January 11th, 2017, less than a month prior to its release (official trailer). To avoid confusion with Eastshade, currently still in development, we released a short video explaining the reasoning and history behind the small titles’ odd format and development. As outlined in the video, our reasons for creating such an odd and small game were three-fold:
As an inexperienced studio, we wanted experience shipping a title before shipping our much larger and more costly-to-develop title Eastshade.
We wanted some supplemental funding, and suspected a small game would be equivalent work and more effective at fundraising than a crowdfunding campaign. More on that later.
We like short format games, and were deeply excited to make this one.
So the title seemed like a good idea from both a business perspective and an artistic one. The idea for Leaving Lyndow came to me after playing a short experimental game called Home is Where One Starts by David Whele. I enjoyed the 30 minute vignette of a title, and found its brevity refreshing compared to the much larger time commitment of other games. As a consumer, I feel there is a lack of games in this format, and I found myself inspired to make my own. Apparently many in the general gaming public are not as enchanted by short games as I am. More on that later.
Leaving Lyndow released to mostly positive reviews, scoring a 74 on metacritic (sadly one point below a green 75), and 84% positive steam reviews at the moment. Between myself full-time and a few part-time contractors, development took over six months, which was about double the time we planned for it. I’d like to reflect on the debacle as a whole. There are two perspectives in this postmortem: Reflecting on the development process, and reflecting on the business strategy and launch. Since I’m a near one-person show, these undertakings are blurred together for me, so I am going to mash them both into this one article.
What Went Right
Small Game Instead of Crowdfunding
First and foremost, did this thing work? Did it better prepare us for Eastshade’s launch? Was it an effective fundraiser? Additionally, was it effective at building brand?
At this point I’m entirely certain that had we gone on to release Eastshade as our first title instead of this small thing, it would have been a major disaster. Between localization, learning the Steam back end, finalizing all the pieces, running a closed beta, I can only imagine how much more difficult doing all that for the first time would have been with a game ten times as large and complicated. For example, shortly after launch I accidentally removed the soundtrack from the Steam depot, causing everyone’s soundtrack to vanish from their computer as Steam automatically updated the removed files. Even worse, after some reports, I discovered there was a bug in the localization system, where somehow it had generated a few duplicate string ids scattered throughout the games’ text. This resulted in some dialogues feeding you the wrong line. The only way to fix it was to go searching through the localization tables for duplicate ids, give the duplicates new ones manually, and hunt down which string was supposed to be in the corresponding text field. This was especially difficult when I don’t speak the language of the localization I’m fixing! Now what if that had happened with a localization table ten times as large? I’ve since pinpointed exactly how those texts got jumbled and now all that’s sorted for Eastshade. I’m glad I’ve learned the ropes of all this before launching our 4+ year development title.
As for fundraising, for what is now our first three months of sales, our revenue is about $10,000 USD across both itch.io and steam. That more than recoups what I paid out to contractors, and now every unit sold is slowly paying me back for my own time spent. I expect this figure to continue to rise throughout the year, and we are currently working to bring Leaving Lyndow to consoles. So I don’t expect it to expand Eastshade‘s production budget substantially, but over time, I think it will eventually pay for itself handily.
I believe Leaving Lyndow has been an effective marketing tool for Eastshade. Press are far more likely to cover a release than they are to cover a crowdfunding campaign, so the visibility we’ve gained form this release has been substantial. Moreover, thousands of people have gotten a taste for the Eastshade world now, and as far as I can tell they are hungry for more.
This review is telling, even despite its misinformation (Eastshade is not the full version of Leaving Lyndow. They are two mechanically distinct games). They felt the game was too short, gave it a thumbs down, but despite this they are still interested in our next game! Hooray!
Hiring PR Help
As the Leaving Lyndow project was first and foremost an exercise in releasing a game, I knew it would be an excellent opportunity to try working with a PR company. This project would be small enough that if it wasn’t a good fit, the damage wouldn’t be too great. When choosing a PR firm, I think a size match is important. Granted, its not like I’ve done a lot of business with tons of PR firms, so know that this is a bit of arm chair speculation on my part. But it seems to me that if you’re small, and you get a medium or large firm, your launch campaign likely won’t matter much to them. Not because they’re evil, but its just the dynamics of human psychology. You can’t possibly occupy much space in the firms’ organizational focus. Conversely, if you’re a big studio, you wouldn’t want to risk your launch campaign on a small firm that doesn’t have the bandwidth you need for your larger production.
I couldn’t have asked for a better fit than Player Two. @CharleneLebrune knows the games media landscape well and is current in the protocols and practices of games PR. With her help we managed as widespread coverage as we could have hoped for, being covered by the likes of Kotaku, Polygon, and PCGamer and many many more. I can’t tell you how relieving it was to know that the publicity front was being handled in those most stressful months leading up to release. I think it’d be completely insane to attempt doing all the press liaison, review code distribution, and inquiry responding on top of normal development crunch in the final month. Moreover, PR is its own skill, and to do it effectively takes study and practice like any discipline. If you’re indie like me you’re likely juggling enough disciplines as it is, and this discipline is easily outsourced. They don’t need to be trained in your tools or familiarized with your game architecture to be effective and save you tons of time, so I think it makes a lot of sense for an indie studio to contract a publicist.
A Rapid Prototype
As I’ve been working on a large game for the last 3.5 years, sometimes my brain tries to scheme a way out. “What if I just made a smaller game instead of this one!” And for a minute I fool myself that if I could only start fresh with something “smaller” things would be easy. But, alas, this is usually not the case. Every game seems smaller than the one you’re working on. Only when you delve into the depths of production do the complications in your designs show themselves, and once more you are reminded that the pan is hot. But this time the smaller idea I had seemed so assuredly small, and my inspiration burned so hot that I couldn’t help but succumb. Cautious as I am of the wicked allure of a smaller game, I told myself I had one night to produce a prototype. If I didn’t have a skeleton prototype that could be played start to finish by morning, I’d end it right away. By 6 am I’d accomplished just that. And rather handily! I knew it could be done. And once I’d discussed it with my co-designer girlfriend, we verified the sanity of the idea from a business perspective. Even with all this sanity checking, my scheduling was off by double.
Using Eastshade’s Build
It was tempting to create a new Unity project directory and code Leaving Lyndow from scratch, but I decided to branch the Eastshade build and commandeer the game logic. Its easy to forget how time consuming simple things like pause menus can be, and it was nice to have scaffolding to work from. The added benefit to this was that I was able to polish things like the options menu, and easily take those improvement back into Eastshade. I’m not an accomplished programmer, but I already find myself having those all-too-programmer temptations to create things anew, ensuring elegance and bloat-freeness. While a noble sentiment, I have found this persistent desire to remake and refactor to be dangerous. I have no doubt it is the surefire way to become a better programmer, but I also have no doubt it is the surefire way to never finish games. Sometimes one has to decide: Do you want to become a better programmer and be totally satisfied with your architecture? Or do you want to finish the darn game? The very essence of Leaving Lyndow’s development was the later.
Spending Extra Time on Optimization
During the development of Leaving Lyndow, I spent a great deal of time on optimization. In fact, There was one shader I spent almost two weeks optimizing alone! It was one of the most prevalent shaders in the game (the vegetation shader), and ended up increasing frame rate by about 30% across the board. I’m very glad I did this. I think a smooth frame rate is something players appreciate a lot, and I’m convinced it tremendously improves the perceived production value of your game. Often the first criticism of a bad game is its poor performance. All this groundwork in optimization will carry through to our future games.
What Went Wrong
Game Length
From a developers perspective, I feel game length is a bit of a paradox. The harder you work to hone the experience, cutting the weak parts, streamlining the tedious actions, the shorter the game becomes, yet the better what’s left of it is, and consequently the greater the loss is felt for lack of content.
Leaving Lyndow, for its shortness, is fairly dense. Much to the sorrow of many players, your avatar cannot run. Yet despite your movement being slow, the game’s pace doesn’t feel slow, because within under an hour, you experience six entirely distinct environments, and five unique music tracks. Compare this to other adventure games, where you might see the same number of environments and hear the same number of songs but over the span of six hours. I believe its this density of audio visual content that makes each moment you spend in Leaving Lyndow exciting, but its exactly this density that collapsed the game into such a short play-time. “I liked it! Why didn’t you just make more?” the gamer says. “There was more,” responds the developer “but I trimmed it down so that you would like it.”
It is said that “too short” is the best criticism you can have, but in Leaving Lyndow’s case, given the ubiquity of the criticism, I think it may indeed have actually been too short. I think there’s a reason people don’t make short games. I don’t know if the market’s bias against short titles is self-perpetuating, and we are working against arbitrary length standards, or if we’re rather working against ones inherent in the medium, but one has to deal with the perception no matter the cause. If I could do it all over, I’d have made the game longer. In addition to adding more content, I would have worked a bit to maximize length with the content we had. I think the content we had could have sustained interest for longer than I’d thought. Moreover, there is a certain startup cost to create a new design, and once you get things working, additional content is a bit cheaper. We could have increased the price to compensate, given that most agreed the price was fair for the time they got. They just wanted more time.
Not Launching With a Discount
Given the low price point of $3.99 USD I decided to release without a launch discount. I thought discounting such a low price was unnecessary. After all, 20% off would have only been 80 cents less! In hindsight, I have a feeling this was a mistake. I can never know for sure how much damage it did, but I suspect we would have more than sold enough extra copies to compensate, and more importantly, we would have had a better chance of holding in the “popular new releases” list.
This is all speculation, since Valve’s discovery algorithms are a guarded secret, but myself and a few of my fellow developers feel that staying in the popular new releases list is very important not just for launch performance, but for the long term revenue of your game. Leaving Lyndow seemed to be just on the threshold of selling enough, because we kept popping in and out of that list for the first two days of launch. Despite the fact that the list primarily brings traffic during the first week, to this day (3 months after launch), our placement in that list is responsible for a whopping 2.3 million impressions, and 20% of our total page visits. I can imagine if we held firmly in that list instead of popping in and out, we may have sold twice as many copies at launch, potentially improving our standing in Steam’s algorithms forevermore. Given the average steam user’s trepidation to ever purchase anything full price, I think that little green discount swatch in the corner of our thumbnail would have improved our conversion just enough to make all the difference. I need to say it again, this is all my personal speculation, so take it with a pinch of salt, but you can bet your boots our next release Eastshade will have a launch discount.
Confusing Customers and Press
I don’t think this was so much a mistake we could have corrected, but rather an inevitable consequence of doing something as bizarre as we did. Leaving Lyndow is a short game that looks similar to Eastshade at first glance, is set in the same world, is only 45 minutes long, yet its totally self-enclosed, is not a demo, costs money, and has nothing to do with Eastshade mechanically. From a branding perspective, does it get more confusing than that? We knew this would confuse people, so we went through great lengths to make things clear in every press release. That’s also why we went through the effort of making that talking head explanation. I clarified often on twitter as well. Yet many still mistook Leaving Lyndow for a demo. Fortunately most reviewers conceded it was nonetheless decent value given its polished content and low price point. But there were a few who had it in their head that short things are demos, and demos are supposed to be free. This was mildly frustrating, but all in all the vast majority of people didn’t complain, enjoyed their experience, and were excited about our next title. So I think the confusion was a small price to pay, but I feel this point deserved mentioning for those of you who might be considering unconventional business plans.
Character Face Designs
The most devastating mistake I made was the design of the character faces. I had in mind to do them part monkey, part human, and devised the cultural quirk that they cover their mouths (largely to avoid lip syncing the jibberish greeting lines each character dispenses when you speak to them). I have no problem with them looking hideous. I think we as a species would likely be better off if we minded looks less. My issue with them is that for all their hideousness, the design isn’t creative, clever, or even iconic. Its bland and hideous at the same time. We likely would have done better to go full anthropomorphic, and put any other animal head on (an animal that isn’t already so darn close to human anatomy).
To make matters worse, the jaw line and mouth is an extremely important feature in facial recognition, and it became even harder to create distinct appearances for the characters. I assure you the challenge of face design without a mouth is more expensive and arduous than lip sync. This shortcut turned out to be not a shortcut at all. Combine this with the fact that almost everyone is bald, and you have a recipe for bland characters that all look the same. I’m working with an amazingly talented character modeller, but I handled the face designs myself, and character design is something I’m rather bad at. I should have found someone else to do it.
I’ve worked myself into a bit of a bind here with our island of ugly characters. I have decided I’m going to rip the band aid off right now, and we’ll be adding new character types for Eastshade. The monkey folk may remain, but they will only be a percentage of the population, so at least we have some variety and interest. It might be a bit strange lore-wise for all these new races to arrive suddenly for Eastshade, but I hope it can be forgiven for the sake of future world-building.
Conclusion
While we will never again make a game this short, we accomplished many goals with the Leaving Lyndow project. Most importantly, it vastly reduced the chances of our next big release becoming a spectacular train wreck. Some of the development work we did will carry through, and our code is somewhat more battle-tested now. Our brand got some attention, and thousands now await what we do next. I learned how to use the Steam back end, and got a little better at talking about our games. We’re well on our way to breaking even on the production costs, including my own time, and I’m hopeful the long tail and console release will help fund future development. Hopefully another thing we learn from this is how to port and certify a game for console, which still lies before us. One last thing I personally got out of Leaving Lyndow is the confidence to know this indie thing can work. All these years I’ve felt very uneasy about the future. I still feel uneasy, as it comes with the territory when you are running your own business, but not as much as I felt before, and its nice to know that when we ship a game, money does indeed come into the bank account.
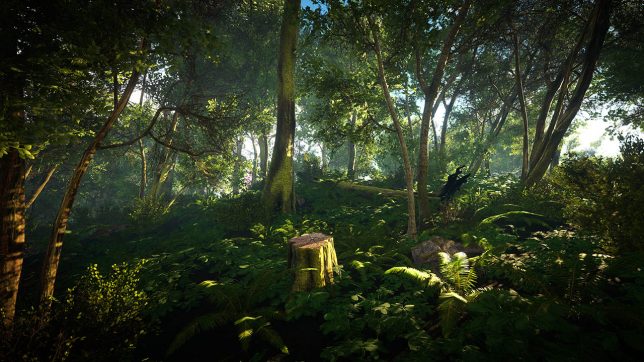
As an environment artist in the games industry, I’ve made quite a few forests over the years. At Eastshade Studios, both our recently released title Leaving Lyndow, and our upcoming title Eastshade feature plenty of forests. There’s something very powerful about walking through a shroud of trees, and attempting to recreate that feeling in a game world is one of my favorite things to do. In my unending quest for pretty forests, I’ve learned a few things that I believe are important to eliciting that growthy feel. Some may seem simple, but I’m always surprised by how many game forests overlook some of these.
A disclaimer: This article is not about how to create great foliage assets. There are quite a lot of good resources on that topic. This is also not a technical tutorial on how to author a forest in terms of shaders, lods, or optimizations. I actually have a lot to say on that topic and would like to write another article at some point on that specifically. This article focuses on the larger picture such as deciding what assets you need to make, how best to use them, things to think about, and ideas for more believable and less monotonous forests.
Reference
I’ve heard this a thousand times, maybe you’ve heard it a thousand times, I’ve said it a thousand times, and nonetheless, I will say it again: Reference is paramount. Virtually all the things mentioned here I learned as a result of looking closely at reality, and making decisions about what is important to the big read. Walk in forests, pay attention, look at what’s there. Rely on what you objectively see, not your own ideas of what a forest has. Whenever you are trying to capture the magic of reality, you need to be informed by what you actually see, not what you think you see. This is true even if your forest is a stylized fantasy forest with orange waterfalls and blue bushes. With that being said, let me pass on some things I’ve found to be important.
Clustering
Resist the urge to scatter foliage and trees evenly over a space. Organic randomness is a funny thing, so don’t be afraid to boldly cluster a lot of things together while leaving other parts practically barren. On top of this, a lot of small shrubs and sapling tend to grow symbiotically at the base of other plants. In addition to looking natural, it can also cover ugly intersections between your trunks and the ground. Sometimes there is a tightly packed cluster of thin trunks that almost seem to grow out of each other. Don’t miss things like this! Sometimes I see people spending hours toiling away at leaf normal maps while overlooking more noticeable things like tree placement.
Trunk Density
This may be the most important tip in this write-up. Walk in a forest, and you will notice there are a LOT of trees. Hundreds of trees are in view at any given moment.
While mastering this level of density may seem like more of a task in optimization than a task in art, there is actually one crucial art trick that helps performance as much as any draw call batching, shader optimization, or GPU instancing, and here it is: Not all of your trees need canopies. Getting a tree to look right standing by its lonesome requires a lot of triangles in the canopy, and this is the way we author most trees. But when many trees are clustered together, the canopy reaches maximum fullness rather quickly, and any additional trees are adding thousands of triangles, but not helping fill the canopy. Put another way, we tend to reach our desired canopy density long before we reach our desired trunk density. So what can you do? Add trunks without canopies. In my case, I just use my dead tree models, which are much lower poly since they have no leaves.
Dead Things
Something I see commonly neglected in game forests are dead things of all kinds. A large percentage of the trees in a forest are dead with no leaves. This is true for both deciduous and coniferous forests. On top of adding believability, they also have the added benefit of being lower poly since they don’t have canopies (see the section on trunk density). When trees die, sometimes they fall. You can make an old overgrown log, or simply turn a tree sideways branches and all. Then there are stumps. Typically when one pictures a stump it’s the man-made stump, but there is also the broken off tree, or rotted out variety of stumps, which are natural and numerous in all forests.
Don’t forget unlikely notable sights, like a fallen tree leaning against another, a log dangling off a boulder, or a tree that has fallen into a river. Sometimes we neglect these things because we’re too focused on the more common sights, but these sights are often the most interesting in a real forest, why omit them from our fake forests? They are critical for breaking up the monotony of the environment.
Trunk Bases
Humans tend to look where we step, so players will spend most of their screen time with their camera pointed eye level or even cast downward a little. This holds true in both first and third person. When we author a tree, we often focus on its canopy, likely because it’s the largest portion of the tree in terms of sheer size. While the canopy is important, especially the silhouette as its cast against sky, in denser forests the canopy tends to get swallowed up by other canopies, and the trunks at the eye level become even more important. Photogrammetry (or photo scanning) can help a ton with this, especially since the texture of a tree trunk and its organic shape make for perfect photogrammetry candidates. You may have to use a separate 1:1 texture for the lower part of the trunk, and find a way to switch to tiling texture as you move up the trunk. This can be handled with a blend shader, or with multiple meshes if you can find an undistracting place to put the seam. Another option is to devote more texel density to lower parts of the trunk in the UVs.
I must admit I haven’t put enough love into some of my own tree trunks where they meet the ground, but it’s something I will definitely pay more attention to for my tree assets in the future.
Undergrowth
Generally every available space on a forest floor is covered with some kind of foliage. One’s immediate intuition might be to use grass, but tall green grass is not terribly common for a natural forest floor. It can definitely create a cool surreal look to use a sea of grass under tall trees, but just know that shrubs, ferns, and low lying leafy stuff is much more common.
Rocks
Rocks of all sizes are important. Pebbles in spots without plants can add a lot more believability to the barren ground. More and more people are using dynamic tesselation and building the smaller rocks directly into the texture. This is a great option if you have the shaders to support this. Otherwise placing the pebbles as meshes works as well.
I prefer to model my mid-size rocks in clusters. This makes it possible to spend time assembling a really nice looking formation which you can propagate quickly. Rocks are probably one of the best use cases for photogrammetry I can think of. If you have means to do this, I’d recommend doing so. Contrary to what some may think, it won’t save you time. It will very likely be more difficult and take longer than modelling them yourself, but the results are worth it.
Rivers, Streams, Lakes, and Ponds
In real life, if you get to the end of a forest hike without seeing any water, it was probably a boring hike. Hiking trails are often carved because of water. Water is probably one of the first things you should be laying down while deciding on the layout of your forest. I tend to decide on lakes and rivers right at the start, and build my forests around them.
There’s no two ways about it. Rivers are hard. If you’re new to game art, you may assume there’s an industry standard way of making rivers that you’re not being let in on. There’s not. If you know the perfect way to do them please let me know. I’m just here to tell you that you’ve got to have them, else you are committing to a forest no one would want to hike in. When I’m first starting my forest layout, I often lay in the bodies of water first, and structure the entire biome around them. Something that helped the look of my rivers was to dress the edges of my rivers in lots of rocks.
Particles
Forests tend to be very visually busy environments. This onslaught of noise can often make for an image without easily perceivable depth. This is true for forest photography as well. Something that can help with this is particles, weather it be butterflies fluttering about, leaves falling, white fluff drifting in the air, or dusty specs. The parallax and movement helps with perceived depth.
Time Wasting
There are a couple of rabbit holes in forest making that I feel can waste a lot of time for little benefit. Approach these tasks with caution so you don’t fall in.
Variants – When creating a new type of foliage, start with one variant. I’m serious. Don’t start plugging away at a second or third variant before you even test your plant in an actual forest. For one, you don’t even know if this new foliage will work, or what will make it look good. So don’t waste time making five variants from the get go, only to discover you’ve crafted them in a way that looks awful in the context of a forest. What’s even more important: See how few you can get away with first. Will anyone even notice all the extra variation? Is there something more important you should be spending time on that will offer variety in a more impactful way? I got really far with only four broadleaf variants (eight including dead versions).
Modelling For Texture Bakes – This is quickly becoming the de facto way to create foliage textures, and I do it too, but you have to be smart about it. Don’t waste time modelling the perfect leaf and making variants of it. I don’t think it’s an exaggeration to say foliage textures are 90% silhouette. Spend all your texture creation time iterating on the silhouette, not the normal maps, or making sure every twig lines up with every group of leaves. Step back. Look at the big read. To illustrate my point, take a look at the comparison image below. On the left are some trees with a beautiful diffuse and lovingly baked normals. On the right are the same trees with a pure green diffuse map and no normal map at all. All it has texture-wise is an alpha mask.
As you can see, it’s not a huge difference. Squint your eyes and you probably can’t even tell. The left does look a little better, but ultimately the silhouette carries the weight, and both renderings read similarly as a tree. General leaf size, branch structure, coverage, and scraggly twigs should be where you focus your efforts.
Be Bold with Experimentation
I think it’s important to be creative with your assets. Sometimes you can stumble on something interesting, even if it’s not what you intended. For example, I onced jammed the second LOD model of an oak tree into the ground and found its canopy made excellent bushes. It was already low poly since it was meant to be LOD1. I did some quick work making them into proper bushes, and now I use them even more than my original bushes, and it offers great variety to the mid-level shrubbery.
Conclusion
The TLDR is:
Use reference. Do research on real forests.
Don’t distribute plants and trees evenly. Make some clusters of tightly packed vegetation.
In dense forests, not all the trunks need canopies. This maintains density while saving polygons.
Don’t forget about dead trees, fallen logs, decaying stumps, and anomalies like a dead trees leaning against other trees.
Put extra love near the base of the trunk, where players eyes will fall.
Cover the ground with foliage. Ferns and shrubs are more common than grass.
Use rocks of all sizes to break up the endless foliage.
Water is usually the most interesting thing in a forest. The more lakes, ponds, and rivers the better.
Particles like bugs, leaves, fluff, or dust can add depth.
Don’t waste time on leaf noodling or excessive variants.
Don’t be afraid to try using your assets in unexpected ways.
Hey everyone! Leaving Lyndow is out! Like, right now! You can go play it! After three years we finally have something you can play. It’s not Eastshade. It’s not a demo for Eastshade. It’s its own thing. But we’re deeply proud of it, and we hope you like it!
Here’s where you can buy it at the moment: Steam itch.io
In September 2016, we chose to take a break from Eastshade development to make a small Eastshade spinoff called Leaving Lyndow. The reasons for this were threefold: Firstly, as an independent studio who has never shipped a game, we feel unprepared to manage the logistics of a large release like Eastshade. You only get to launch a title once, and we feel one misstep could compromise four years of perseverance. This small game gives us a chance to experience the process. Secondly, we want additional funding to supplement Eastshade’s development while still remaining independent. Finally, we feel Leaving Lyndow enriches the Eastshade universe, and is a great way to begin building out the world for people. We want to allow you all in to Eastshade’s world right now! So without further ado, we present the official trailer for Leaving Lyndow.
We realize releasing a small game right in the middle of development of a larger game isn’t conventional, so here’s a little further explanation.
And if you support us on greenlight we’d be extremely grateful!
The sky is an important character in Eastshade. In addition to taking up a large portion of the screen at any given moment, it also gives players the sense that the game world has its own beating heart. While I knew I wanted to make the sky spectacular and dynamic, I also didn’t want to spend tons of performance or development time on it. While something like dynamic volumetric clouds can look absolutely awesome and convincing, they are out of my comfort zone technically and are very expensive to render at high enough detail to look realistic. After all, Eastshade is not an airplane simulator! So I opted for a solution with simple parts that I could hone easily with my artist’s eye, rather than a more procedural approach.
The Day Cycle Manager
Firstly, I knew there were going to be a bunch of values to tweak for each distinct time of day, so I wanted one central place to save/load and tweak them all. Since the sky setup is made of quite a few parts and shaders, I was led to create what I call the “DayCycler” component, which looks like this:
This custom inspector may look formidable with its many fields and values, but it’s really just a bunch of references to material values, light values, and rotations pertinent to the global lighting. Inside this component is a simple update loop which interpolates between the most recent and incoming time of day presets. With this simple system, I can go through and tweak each distinct time of day like a painter, and all the in-between times are taken care of for me. No need to manage 20 different IPO curves. The times are 0-1 rather than 24:00 so don’t be confused by times like 0.175 (that would be something like 4:12 AM). There are a lot of things in the world that look at the time of day which are more local, such as a a hanging lantern, or chirping birds. Little lights and audio sources like these drift in and out of memory as the world streams around the player. Referencing and managing all these little things in this central controller would be quite cumbersome, so the second part of this system is this little component:
I attach this to any little light or audio source that is day/night dependent and it looks at the current time of day and decides what value it should be independent of the DayCycler. No need to micro manage values like these.
Sky Composition
The “sky” is composed of a few different elements:
Fog – Starting with the closest and moving out, we have the all-important fog. I use the fantastic Fog Volume for this. The reason I love fog volume is because of its gorgeous and fairly cheap light in-scattering. If you’ve never heard of in-scattering, I suppose it can be described as the look of sunlight passing through fog. I’m not talking about god rays (though in real life I believe its caused by the same thing). It adds a lot of depth and a sense of light direction to the atmosphere.
Clouds – Call me old fashioned, but I like the look of photo clouds. The biggest issue with photo clouds is that it is difficult to make them dynamic. My strategy was simply to take photos on a day that the clouds didn’t have a strong sense of light direction, combined with touching up the parts that look too directional. Once I had my 360 degree cloud panorama, I made an alpha mask cutting out the blue parts because I wanted to encapsulate the clouds seperate from the atmosphere. I mapped my clouds to a dome that rotates slowly to give the impression that the clouds are moving along the horizon. This trick is stupid simple, and is ineffective for giving players the impression that clouds are passing over them, so if you want that you will have to combine this with other methods like overhead UV scrolling clouds or something like that. I actually haven’t gotten around to doing overhead clouds yet, but funnily enough players tend to rarely look directly up and haven’t noticed.
Atmosphere – I find a simple 2-value gradient shader on a dome mesh is sufficient for the atmosphere. The opacity and colors animate with the day cycle. I increase opacity near the horizon so it looks thicker, while the stars show through more when you look directly up.
Sun – There are two parts to my sun. I have a sun flare, and an actual sphere mesh with a highly emissive solid color. This way I get a nice bloom, even if the sun is only partially showing. This is particularly useful for me in Eastshade, as there are daily eclipses and I needed a way of showing the sun slowly hide or emerge from behind the moon. The sun’s directional light doesn’t actually move around in the sky, it just rotates. To keep the sphere lined up with the flare, I rotate the sphere around the player’s head, rather than around its own center.
Moon – I designed a custom shader for the moon. It’s anything but physically accurate. It expands the light angle a bit, and uses heavy fresnel to fake the bending of light around the atmosphere. I have a special light that shines on the moon alone to simulate the sun hitting it. Here’s a bit of Eastshade trivia regarding its moon:
The moon in Eastshade appears habitable, and since its about the same size as the planet you’re standing on, you orbit it as much as it orbits you! In other words, both planets are moons to one another. This means Eastshade’s moon remains in the same place in the sky all the time, which creates daily solar and lunar eclipses. At midday it blocks you from the sun, and at midnight you block it from the sun. Tidally locked, you orbit around each other in a double planet dance all the way around the sun. Is there another world of intelligent life just across the cosmic pond? The residents of Eastshade can’t know. All they can do is look up and wonder…
Space – The furthest background is the space dome. This dome has a tiling star texture, supplemented with bits of geometry for the larger stars to break up the tiling. The reason I use geometry to break up tiling is because having a texture that wraps around the whole sky would require a MASSIVE texture to look sharp. The fact that stars are tiny little dots means they live or die on their sharpness. If I wanted to add a nebula or something like that I’d probably have that as a decal sticker on the star dome, because doesn’t tile and doesn’t need as much resolution as the stars. I’m trying to keep memory and build size down, mostly because I don’t want to waste development time maintaining a huge build.
Finally, its important to note that all these things follow the player around as they move. Since most of these things are supposed to look infinitely far, there shouldn’t be any parallax between the elements.
Not Done!
I’m not done with the sky systems in Eastshade. There are a few things left to do. Among them is come up with some sort of overhead cloud coverage to pass over the player. I’m thinking I will put a flat disc and use vertex color to taper the opacity around the edges. Then I’ll scroll the UVs over a tiling cloud texture. I also want to have multiple cloud textures for different weather conditions and fade between them. I’ll need to make a weather controller that operates on top of the DayCycler and plays off the base values, so I can have any weather condition at any time of day. I’ll need to implement a global wetness property in my shaders that increases gloss and spec, while darkening the diffuse a bit.